So, you survived Episode I:
A New Cloak; groaned past the title of Episode II:
Attack of the Clothes; and still you came back for the final installment--Episode III:
Accesssories of the Jedi!
Well, although the "soft" pieces of the costume were complete, there are a few finishing touches that complete the Jedi look: a wide utility belt; assorted pouches and accessories attached to aforementioned belt; and of course, the
piez de resistance, The Lightsaber. Since hardware was involved, Scott joined the project as advisor and drillmeister extraordinaire.
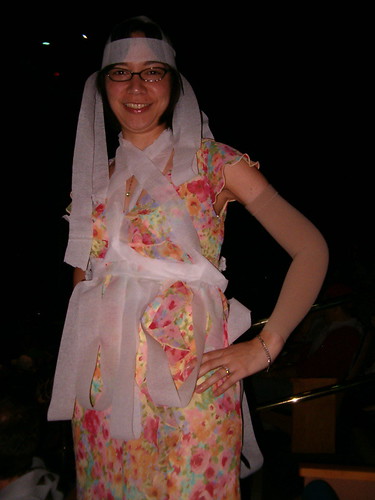
Utility BeltThe utility belt holds the costume pieces together and provides a place for the Jedi-on-the-go to carry essentials.
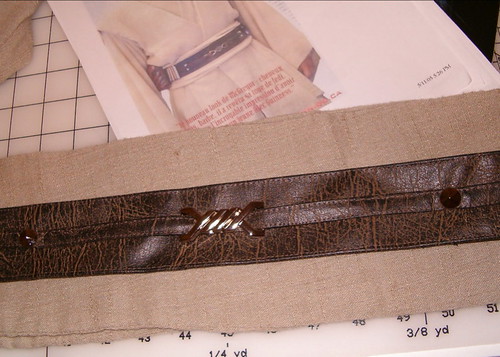
While I found a great
belt tutorial online, I had neither the time, raw materials, nor money to fashion a real leather belt (it's on my future project list). I did have a great piece of faux leather on hand, that I'd been saving to make pouches for ren faire. I like my leather looking scarred and well-used, and couldn't resist this piece on sale. I cut two pieces and interlined them with canvas to stiffen the belt. After a failed attempt at trying to turn the thick material right-side-out after sewing it together, I dismantled it, turned the seam allowances inside and top-stitched the whole leather-canvas sandwich together. So far, so good. I repeated the process with a narrower strip of leather (skipping the canvas) to form the half-inch belt that would lie over the wide one.
The small silver buckle in the center is functional, but since I was going for simplicity, I just slipped the half-inch belt through both halves. Then I centered the narrow belt on the wide one, tacked it on at four points, and covered the tacking with nailhead trim I found at the scrapbook store. Finally, I installed a plastic buckle that would be easy to clip behind my back.
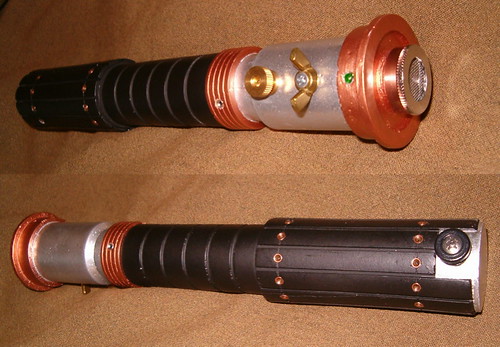
LightsaberThe lightsaber started out as a plastic/resin prop gifted to me by my friend
Gabby last summer.
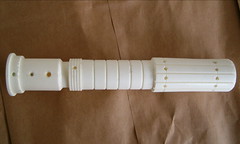
I briefly considered
building one out of found parts in the grand old Star Wars tradition (another future project!), but time was short. So we embellished it with a few items picked up on one of our weekly trips to Lowe's and Home Depot.
The handle unscrews into two parts. We drilled out the holes for our hardware before painting. Originally we tried Rustoleum plastic primer, but to our horror it ATE the plastic! Scott wiped the whole thing down with mineral spirits to stop the spread of craters opening up in the plastic before our very eyes. Rustoleum paint did the same, but Testors model paint did the trick very nicely. We sprayed the grip end chrome and flat black, and the emitter end chrome and copper. I did a fancy bit of masking off to get the effect I wanted. The copper and black look fantastic, but anything really shiney like chrome is never as good in paint.
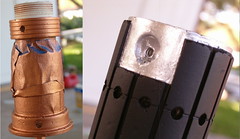
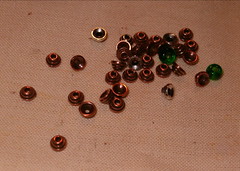
I found some great copper and silver spacer beads at
Bead Dreams--the staff was intrigued by my project and helped me scour the store for the perfect embellishments! The spacers are reminiscent of rivets and dropped perfectly into the tiny holes spaced all over the prop handle. They stayed in, too, but we secured them with a little model glue (careful, that stuff eats paint!). For fun, I glued a translucent green bead on the emitter end to look like a light.
After all that dried, we attached the hardware: a knurled knob, wingnut, and faucet aerator repair kit! Scott adapted a celphone belt clip knob and attached it to the grip end with a screw, so I could clip it on and off my belt.
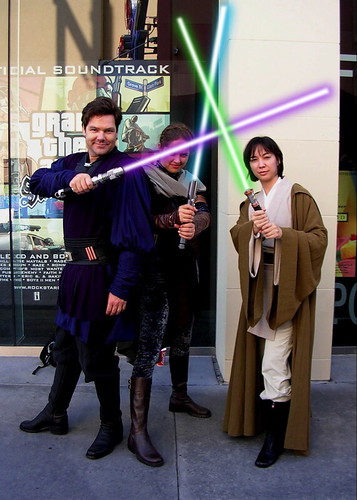
The whole thing was a lot of fun to brainstorm and put together. Later, in photoshop,
Dawn (below center) and
Matt (below left), who I met on opening day at Pleasure Island) added a blade.
 Pouches
To balance the saber clipped to the left side of my belt, I wore two pouches on the right: my celphone and PDA cases! Both of these are leather and fit right in with the look. I left my PDA at home and used the case to stash cash, ID, tickets, etc. Matt got a kick out of the "Jedi celphone".
Well, the saga is complete! Comments and questions are welcome!
Update, June 16: Chris Sarna (
Rebel Legion) generously provided
food capsules for me to clip to my belt at the MGM Star Wars Weekends parade last weekend. What a guy! I met Chris and his wife
Karen at the Revenge of the Sith premier. Karen makes the food clips and also outstanding Jedi leather utility belts.